Ideation
Personal Experience
I've been deeply interested in theatrical lighting design for years, ever since being given the opportunity to play around with a lighting console in my freshman year of high school. The traditional control surfaces for lighting control are very refined and predictable– arrays of faders and buttons, all in established orders to established conventions.
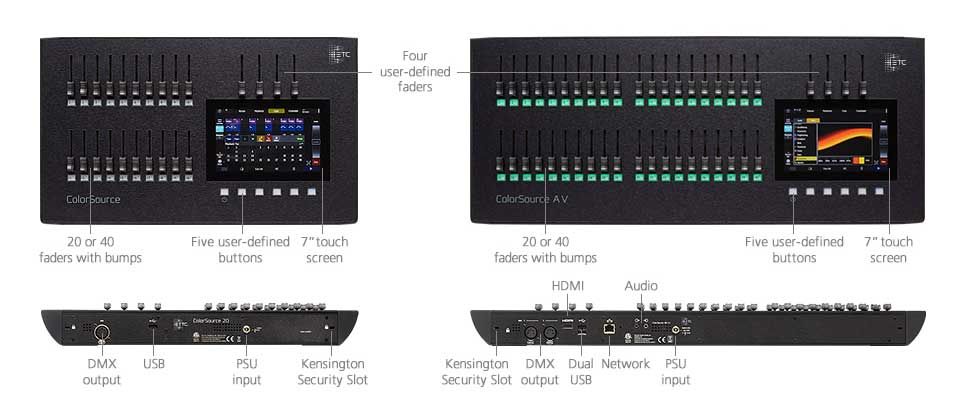
I thought it would be interesting to break up that monotony with something more gestural and energetic– I wanted to be able to control lights with sweeping movements, rather than a small army of buttons.
Original Prototype
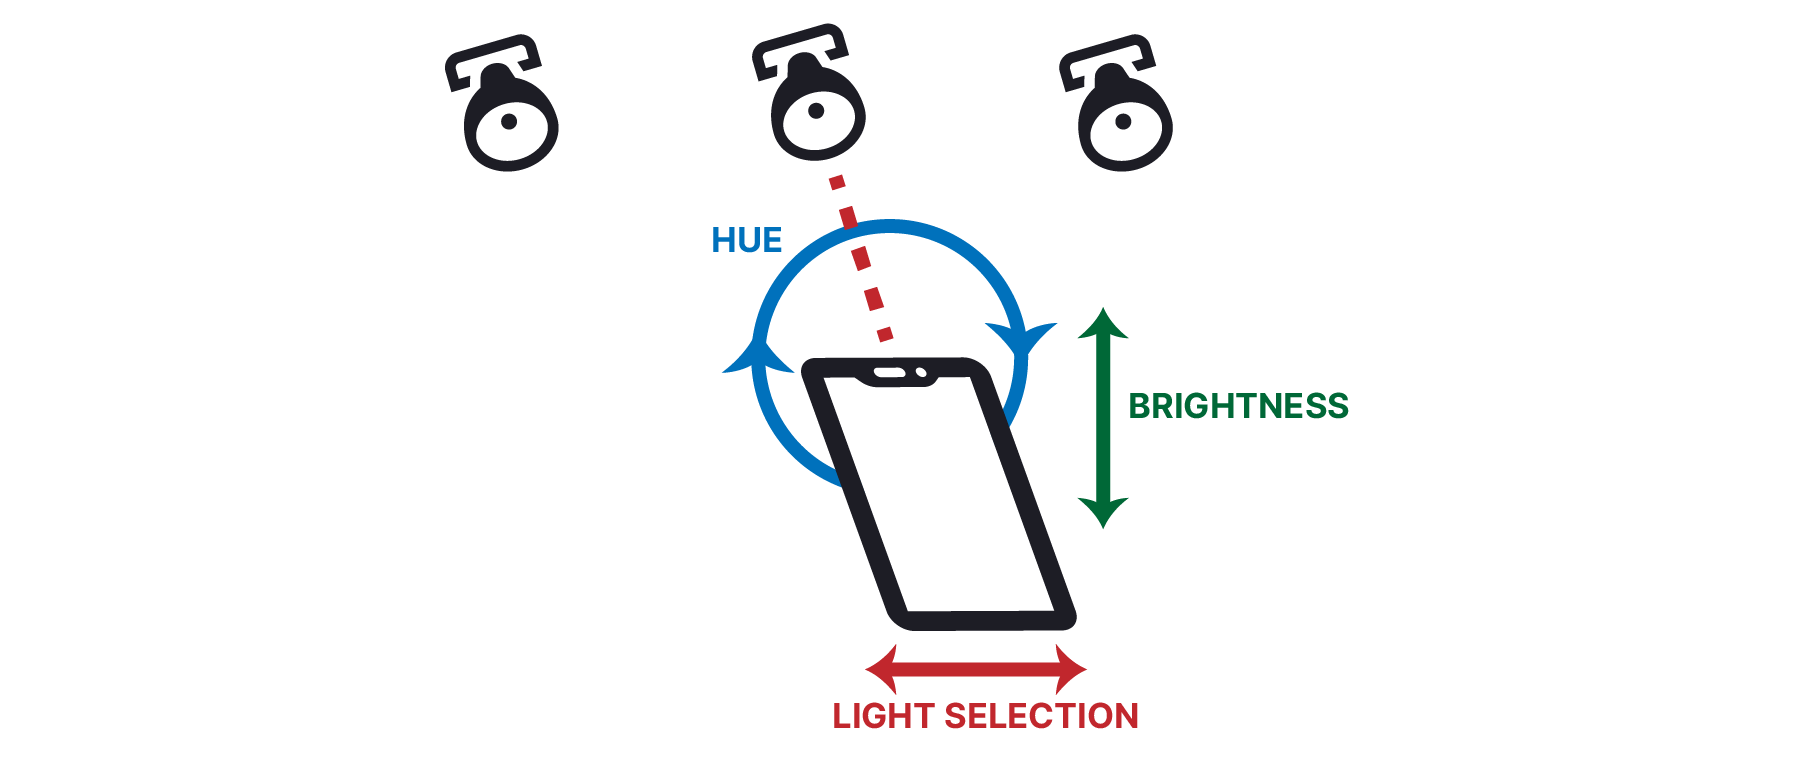
This project is an extension of a project I created earlier in the semester for a weekly assignment to experiment in Arduino serial communication. The controller I came up with was quite simple: a little 6 axis gyro on top of an Arduino Uno, with a button to allow me to 'reset' the readings to 0 to correct for sensor drift should it occur. Pointing it at a light in the x-y 'selects' the light to control, tilting it up or down controls intensity, and rotating it in a circle controls the color as if moving the controller through an invisible HSL wheel. The positions of the lights were hard coded for this little demo, a temporary shortcut for a one week project that I would later fix in its revision as a midterm project.

The input, logic, and output were all processed in the same NodeJS file. The Arduino Uno is directly controlled over usb serial with the Johnny-Five library for Javascript robotics. Output to the lights done through Node DMX, carried through usb serial to an Enttec DMX box before being sent off to the lights. All of the logic and actions are carried out in just under 40 lines of code, with the entire file topping out at only 82 lines including constant definitions, imports, and comments. Just using the right libraries makes my work quite easy in this case.
// Created by Ethan Printz
// For NYU IMA Designing Interfaces for Live Performance
// February 2020
//-----------------------------------
// Light Patch
//    o      o     o     o
//  10-12   7-9   4-6   1-3
//   RGB    RGB   RGB   RGB
//    4      3     2     1
const lightChannels = {
    1:{"r":10,"g":11,"b":12},
    2:{"r":7,"g":8,"b":9},
    3:{"r":4,"g":5,"b":6},
    4:{"r":1,"g":2,"b":3},
}
//-----------------------------------
// Angle mapping
const lightAngles = {
    4:{"start":-30,"end":-15},
    3:{"start":-14,"end":-5},
    2:{"start":-4,"end":5},
    1:{"start":6,"end":30},
}

//-----------------------------------
// Library Imports
// 💡 Node DMX
const DMX = require("dmx");
// 🤖 Johnny-Five
const Five = require("johnny-five");
// 🎨 HSL to RGB
const hslToRgb = require('@f/hsl-to-rgb');

//-----------------------------------
// Initiate DMX and J5
const dmx = new DMX();//💡
const universe = dmx.addUniverse('demo', 'enttec-usb-dmx-pro', '/dev/cu.usbserial-EN237125');//💡
const board = new Five.Board({port: "/dev/cu.usbmodem144301"});// 🤖

// Global variable declartion
let offset = 0;
//-----------------------------------
// Get physical data when Arduino is ready
board.on("ready", () => {
    // Init IMU
    const imu = new Five.IMU({
        // controller: "BNO055"
        controller: "MPU6050"
    });
    // Init button
    button = new Five.Button(7);
    // On button press
    button.on("down", () => {
        offset = imu.gyro.yaw.angle;
    });
    //Get data from IMU when gyro changes
    imu.on("change", () => {
        // Get sensor values
        let roll = imu.gyro.pitch.angle;
        let angle = imu.gyro.yaw.angle - offset;
        let yaw = (imu.accelerometer.roll > 0 ? imu.accelerometer.roll :  0);
        // Calculate which light user is pointing at
        for(l in lightAngles){
            if(lightAngles[l]['start'] <= angle  && angle <= lightAngles[l]['end']){
                let redAdr  = lightChannels[l]["r"];
                let greenAdr  = lightChannels[l]["g"];
                let blueAdr  = lightChannels[l]["b"];
                // Determine color
                let hue = Math.abs(roll)*1.5;
                // Determine intensity
                let lit = (yaw/150) + 0.15;
                // Get RGB  values from HSL
                let channelValues = hslToRgb(hue, 1, lit);
                // Update light
                universe.updateAll(0);
                universe.update({[redAdr]: channelValues[0]});
                universe.update({[greenAdr]: channelValues[1]});
                universe.update({[blueAdr]: channelValues[2]});
            }
        }
      });
});
Midterm Proposal
Changes from Prototype
When presented with a blank check on what to do for a midterm project a few weeks later, I decided I wanted to revisit my lighting controller prototype but this time make it a revised and fully formed final product. Instead of using a cheap microcontroller-based gyroscope, this time I could use the accurate wireless gyroscope we all carry in our pockets: a cell phone.
This required a bit of rearrangement within the tech stack. Instead of running off of a Node server on my computer communicating over a wired serial bus like in the prototype, this time I'll be using my phone connected over LAN to my computer using SocketIO and an Electron app GUI backed by a locally hosted Node server.
User Experience
Industry Research
I reached out to a few friends and mentors in the theatrical lighting industry that I knew from my time as a lighting designer/technician in high school to ask them what they would like to see out of the project, and what would be most useful to the. They all pretty much agreed that this couldn't be a real replacement for large, complex theatrical shows that required fine precision, but it could be an interesting control method for simple productions with a couple scenes or for student-lead productions that would otherwise need to be taught how to use the more complex professional console.
User Flow
Combining what I learned from my industry contacts with the original prototype I had created, this is what I arrived on for the beginning to end user flow. Initial setup and fixture mapping for the light plot is done on the computer, which the user can then scan a QR code on to open up a webpage connected to the desktop app's web server on their mobile browser. The user can then gesturally control their lights using their phone wirelessly from a central location in the venue. Once they have all the scenes and cues they want saved, the user can return to the computer and control the show as if it were QLab or a similar computer–based show control software.

Gestural Design
Of course the most important aspect of any gesturally-based interface is that the motions themselves are user friendly, precise, and accessible. A played around with quite a few different gestural configurations– swapping axes and shifting sensitivity– but eventually through testing with both myself and a couple of my friends I found that the original arrangement I used for the prototype proved to be the most user friendly. It has the downside of not being able to directly control saturation, but I found that putting a large slider on the screen was enough to enable users to control it.
Interface
The interface was based largely off of existing conventions within the theatrical lighting world. Because the control method is so exotic, I found that having a more familiar interface does well to comfort and ground the user. Here is a initial prototype of the interface, showing the layout of the cues, the center light plot, and the top bar with status symbols. The user can scan the QR code with their phone and be immediately brought to the right local network address to receive/send data to the server– a crucial time saver that prevent inputting long IP addresses and port numbers.
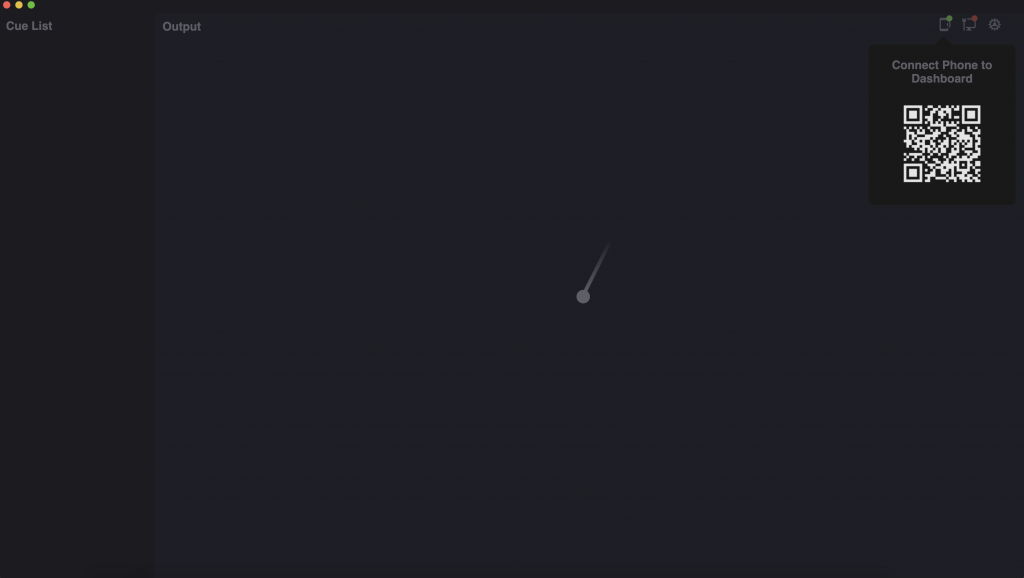
To emphasize the gestural nature of the control, the user is put in the center of the light plot. The line emanating out from the point is the direction that they are pointing. The reason this interface looks barren– aside from the lack of lights on the plot– is that the phone is still intended to be the primary input method. The computer's interface only needs to present a method of connection, the status of the connection, and real time information to confirm that everything's in order.
Development
Electron Server
Due to the complex nature of this updated plan, the programming was far more challenging and involved than it was in the first prototype. The first step was learning how to create and Electron desktop app– something I've never done before but was crucial to creating a properly compartmentalized and reusable app.
This is the order in which that the app and server are bootstrapped:
// Bootstrap server
(async() => {
  console.log("===================================");

  let port = await findPort(); // Find open port
  console.log(`🔌  Found Open Port: ${port}`); // Log port

  let addr = await getAddr(); // Get desktop IP Address
  console.log(`🌐  IP Address: ${addr}`); // Log IP address

  let certs = await generateCerts(addr, port); // Generate self-signed ssl
  console.log(`🔐  Certificate:' ${certs}`); // Log cert info

  let io = await startServer(port, certs); // Start express server
  console.log(`🖥  Server Open At: ${addr}:${port}`);

  let qr = await generateQR(addr, port); // Generate QR code for mobile
  console.log(`📷  Generated QR Code`); // Log QR code

  initSockets(io, qr); // Initialize socket communication
  console.log(`📮  Socket Communication Open`); // Log socket confirmation

  let dmxPorts = await scanSerialPorts(); // Scan for DMX devices
  try{ console.log(`💡 DMX Serial Port at ${dmxPorts[0].path}`) }
  catch{  console.log(`💡  No DMX Device Found`) }

  let window = await createWindow(port); // Open Electron window
  console.log(`🌟  Window Created`);  // Log Electron confirmation

})().catch(err => console.error(err)); // General error catch-all
Each of these functions was a long time in the making, and required quite a bit of background research to get right. They all build off of each other to make sure that the server is created correctly. First up: Portfinder. I wanted to make sure that the port that the app uses for listening to WebSockets over LAN wouldn't be blocked by anything else, so I used that library to get an open port.
// Find open port using Node Portfinder
function findPort(){
  let findPort = new Promise((resolve, reject) => {
    portfinder.getPortPromise()
    .then(port => {resolve(port)})
    .catch(err => reject(err));
  });
  return findPort;
}
Next is getting the local network IP address of the computer that's running the app. To connect to the computer, the phone needs to know both the IP address and the port that the Node server is listening on.
// Get desktop IP Address using a dns/os lookup
function getAddr(){
  let IPAddr = new Promise((resolve, reject) => {
    // Lookup ip address
    dns.lookup(os.hostname(), (err, addr, fam) => resolve(addr));
  });
  return IPAddr;
}
This next step probably took the longest to figure out. I was initially having difficulty getting gyroscope data from my phone to show up on the server. After a bit of tinkering, I figured out that it was because Apple locks access to its phone hardware APIs to only secure servers with HTTPS. Good for security, but considering that I'm trying to get this to work off of a local server that can't be officially authenticated through SSL it's quite an annoyance. Eventually I discovered that I can convince the phone to send the data if I deliver it over HTTPS with a locally self-signed certificate. Hence the need for the next function: generating an unofficial SSL certificate:
// Generate self-signed security certificates for https
function generateCerts(addr, port){
  let pemCerts = new Promise((resolve, reject) => {
    //  Generate self-signed certificate
    const pems = generate({
      name: `${addr}:${port}`,
      city: 'New York City',
      state: 'New York',
      organization: 'NYU',
      unit: 'Ethan Printz'
    }, {
      keySize: 1024, // Default
      expire: 2 * 365 * 24 * 60 * 60 * 1000 // 1 year
    });
    resolve(pems);
  });
  return pemCerts;
}
That done, I finally have everything I need to start the Node server!
function startServer(port, certs){
  let socketIO = new Promise((resolve, reject) => {
    // Require http server
    let server = require("https")
      .createServer({
        key: certs['private'],
        cert: certs['cert']
      },expressApp)
      .listen(port, function() {
        // Open public folder to client
        expressApp.use(express.static('public'));
        // Routing - Phone client at /
        expressApp.get('/mobile', (req, res) => {
          res.sendFile(path.join(__dirname + '/views/phone.html'));
        });
        // Initialize Socket.IO
        let io = require("socket.io").listen(server);
        // Resolve Promise
        resolve(io);
      });
  });
  return socketIO;
}
Next is the code for SocketIO, which handles the connection between the phone and computer over the local network:
// Initialize Socket.IO Communication
function initSockets(io, phoneQRCode){
  // Setup phone sockets
  let phones = io.of('/phone');
  let phoneCounter = 0;
  // Listen for dashboard clients to connect
  phones.on('connection', socket => {
    // Log connection to console
    console.log('📱 A phone connected: ' + socket.id);
    phoneCounter++;
    if(phoneCounter == 1) dashboards.emit('phoneConnected');

    // Upon receiving motion data
    socket.on('motionData', data => dashboards.emit('motionData', data));

    // Listen for this dashboard client to disconnect
    socket.on('disconnect', () => {
      phoneCounter--;
      if(phoneCounter < 1) dashboards.emit('phoneDisconnected')
      console.log('➡️ 📱  A phone has disconnected '+ socket.id);
    });
  });

  // Setup dashboard sockets
  let dashboards = io.of('/dashboard');
  // Listen for dashboard clients to connect
  dashboards.on('connection', socket => {
    // Log connection to console
    console.log('💻  A dashboard connected: ' + socket.id);

    // Emit QR Code img data directly after connecction
    socket.emit('qrCode', phoneQRCode);

    // Listen for this dashboard client to disconnect
    socket.on('disconnect', () => {
      console.log('➡️ 💻  A dashboard has disconnected '+ socket.id);
    });
  });
}
Lastly, a function that is pretty unique to this project– searching through the computer's serial ports to find the one that the USB to DMX interface is communicating on. Had to do quite a bit of research to figure out how devices can be identified on serial ports and what the supported devices would look like.
// Detect and return serial port list
function scanSerialPorts(){
  let dmxPorts = new Promise((resolve, reject) => {
    // Get ports list
    SerialPort.list().then(ports => {
      // Define array to hold registered ports
      let dmxPorts = [];
      let dmxType;
      //  Iterate through open serial ports
      ports.forEach(port => {
        // If a connected USB Device is detected
        if(port.productId){
          // Enttec DMX USB Pro
          if(port.productId == 6001) dmxType = 'enttec-open-usb-dmx'
          // Attatch to DMX Ports obj
          dmxPorts.push({
            'type': dmxType,
            'path': port.path,
            'serial': port.serialNumber
          });
          resolve(dmxPorts);
        }
      });
      resolve(false);
    });
  });
  return dmxPorts;
}
User Testing + Show
Project Stasis
While this project was originally intended to be preformed as a demo on a live stage, it was forced to go virtual towards the end of its development due to the outbreak of COVID-19. Unfortunately that meant no theatrical lights to control, and no real ability to demo the app. As of late 2020, I'm still waiting to return to the floor and have the opportunity to present it in a full setup for a end-of-semester show.